Showing posts with label original recipes. Show all posts

Monday, February 17, 2025

Aloo Palak Tacos

Rejoice! Today, I present to you: the Aloo Palak Taco!

It’s a tasty, hearty, Indian-inspired vegetarian sandwich.

In the process, I’m also giving you a straight-up recipe for making aloo palak, a north Indian/Punjabi “dry curry” vegetable dish (sabji) of potatoes and spinach, which you can have on its own as part of an Indian-inspired meal, with, say, rice (chawal) plus a sauced/wet curry dish (ones with a lot of sauce or gravy, such as butter chicken or anything-korma), or with a dal (bean/legume dish).

(Here, I serve my aloo palak taco along with a basic masoor dal and white rice. Delicious!)

Not counting the sections for appetizers, salads, and breads/rice, my recipe file of Indian dishes has separate sections for dals (the bean dishes, which are typically a little soupy); “wet curries” (whether with meat or vegetables, these have a kind of “gravy”); and “dry curries” (sabji/sabzi, “dry vegetables”).

Dry curries, or sabji, are vegetable dishes lacking a gravy, though they are usually spiced up really thoroughly. You typically make a masala (say, with oil, onions, ginger, garlic, plus your spices), then add your main ingredient, and cook (carefully, usually at a relatively lower temperature), sprinkling water in the pan only to keep the ingredients from sticking, but not so much as to make the dish “wet.” The masala flavors permeate the main ingredient. You might be familiar with aloo jeera (cumin-flavored potatoes), bhindi masala (okra fried with onions and spices), aloo gobi (potatoes and cauliflower), or bund gobi and mater (cabbage with peas).

If you are not interested in learning how to make your own Indian food, you can simply order a dry curry/sabji from your local Indian restaurant, and use the leftovers from that.

Well, I like to play around with these vegetable dishes, since recipes usually make plenty for leftovers, and they’re already nicely flavored. They make delicious vegetarian sandwiches, burritos, and tacos. They’re good in omelets, too. For big burritos, you can add some leftover rice. For burritos and tacos, I usually add some neutral-flavored cheese, such as mozzarella, Monterey jack, or provolone (sliced or shredded). Having a layer of melty cheese against the burrito or taco tortilla helps give it some structural integrity. Which is so important for hand-held foods.

Which brings us to aloo palak tacos.

Making the tacos is straightforward, if you know how to treat flour tortillas nicely. Whether for burritos or tacos, you need to heat your flour tortillas so they will bend and not break. I use a big, heavy skillet. You might have a griddle or tava. You might need to very lightly oil the surface to make sure the tortilla doesn’t stick. Heat on one side, turn it over, add a layer of cheese, let it get warmed up. Don’t heat the tortilla until crispy, only until pliable. Then add your filling—in this case, a few spoonfuls of reheated leftover aloo palak. Bonus points for garnishing with some chopped fresh tomatoes. Ta-da!

And now, here’s my recipe for aloo palak (potatoes and spinach). It’s based on a recipe I received from Aman and Gurcharan Aulakh, a mother-daughter duo who, in March 2009, taught a series of “Punjabi Home Cooking” classes at the Missouri Botanical Garden. The ingredients are the same, but I’ve tweaked the method a bit from what they told us. (The biggest difference is that they precook the potatoes in a casserole dish in the oven, covered with sliced lemons to prevent browning, while I simply steam the potatoes.)

Aloo Palak

Prepare the two main ingredients:

  • 4 c. peeled and diced potatoes (approx. 1-inch-long rectangles): steam until just done, not mushy, but completely done, and set aside
  • 2 c. frozen chopped spinach: thaw and squeeze out moisture (I thaw in water, then squeeze out in a wire sieve); set aside

Make the masala; note that at any time the ingredients start to stick, sprinkle some water, but not so much water that you make a sauce:

  • 3 T. vegetable oil
  • 1 medium onion, chopped
  • 2 t. minced garlic
  • 1 T. minced ginger

In a wide, heavy-bottom skillet, cook the above until the onions are translucent. Then add the masala spices all at once; lower the heat to prevent burning; sprinkle water as necessary:

  • 1 t. turmeric
  • 1 t. cumin seeds
  • 1 t. black pepper
  • ½ to 1 t. red chili powder (ground) (I use Kashmiri red chili powder, but use whatever ground red chilis you want, or none at all; it’s to your taste)
  • 1⅓ T. ground coriander seed (yes, it’s a lot, but you’ll be glad because this is really good)
  • 1½ t. salt (or to taste; I usually use 1 t., then taste at the end)

After the masala has cooked enough (about five minutes) (you’ll know when, because the oil kind of starts separating out, and it looks and smells like the spices, oils, and onion are all melded), stir in the spinach. Again, you’ll need to sprinkle water to keep it moist. Then add the potatoes and stir gently. Again, sprinkle water if necessary. The potatoes should absorb the flavors of the masala.

Finally, add:

  • 1 T. kasoori methi (dried fenugreek leaves, which you can buy at an international store) (I rub the dried leaves in my hands to break them up a little)

Stir and heat through. Taste for salt.

Tuesday, May 28, 2024

My Tuna Pasta Salad

My humble contribution to the universe of pasta salads. I devised it in college, and it’s had real longevity among my go-to dishes. It’s tasty, filling, relatively healthy, and it makes a can of tuna go a long, long way.

As with other dishes of this nature, relative quantities are up to you. I’ve never codified it with exact quantities. I adjust the mayonnaise dressing as I go.

Serving: Serve it on a lettuce leaf, or on a bed of shredded lettuce, mixed spring greens, or alfalfa sprouts. Triscuits are a nice accompaniment. You’ll probably eat the last portion right out of the plastic storage tub you had it in, standing over the sink.

Julie’s Tuna Pasta Salad

  • 1 lb. box of rotini pasta, cooked in salted water until done (I often use tricolor rotini)
  • 12-oz. can tuna, packed in water (not oily) (break the large chunks into smaller pieces)
  • 1 crown broccoli, trimmed to small pieces (include peeled, chopped stalks, too) (extra points: consider blanching the broccoli a few seconds in boiling water, then shocking it in ice water to stop the cooking, then drain completely)
  • one half to 1 crown cauliflower, trimmed to small pieces (total volume about equal to the broccoli)
  • 1 medium to large carrot, peeled, cut in matchsticks or coarsely shredded (about ½ cup)
  • ½ cup sliced black olives, chopped, California/ripe (about half of a regular 6-oz. can)
  • ½ lb. cheddar cheese (orange, boing-boing, government-style; medium or sharp) (but pepper jack or Monterey jack is good, too), cut into little bricks or cubes
  • mayonnaise, your favorite kind, about 1 cup
  • apple cider vinegar, about 1/2 cup
  • salt, black pepper (to taste)

Mix it all together gently in a large bowl or stock pot. I usually whisk together the dressing ingredients (mayo, vinegar, salt, and pepper) separately before folding it in to the rest.

You may need to add more dressing or mayo. Adjust all the ingredients to your liking.

Preparation tip: after cutting the cheese into bricks or cubes, toss them with a pinch of flour, and the pieces of cheese won’t stick together before you stir them in with the rest of the salad.

This yields about 14 cups (or about 3 quarts) of tuna pasta salad.

Yes, it makes a lot, but part of the charm is that it’s tasty enough that we’re happy to eat it for lunch several days in a row. Just spoon it into a bowl and eat it with a few crackers; it takes virtually no time in the kitchen during our lunch breaks.

Wednesday, January 4, 2023

Mark’s Good Old Stuff

It’s not an heirloom recipe, but to me it’s a classic. It helped me survive graduate school. You can file it under “goulash” or “one-dish meals,” but you can also label it “cheap, first-apartment food” or “culinary atrocity number 537.” The major sin here is a ham-handed blending of Italian and Mexican Tex-Mex flavors. The basic idea is to use canned chili, plus other ingredients, as your pasta sauce.

Don’t knock it ’til you’ve tried it.

I have two versions to share. Mark, referenced in the title of the recipe, was the owner of the pet shop I worked at all through college. One version of the recipe amounts to the original notes that I wrote down to the best of my memory, after watching Mark make it as a quick, tasty dinner one night. It will give you an insight into how to approach such a dish as this.

I had never seen Mark cook before, and I don’t think I ever saw him fix any food after this. At work, if we ever had any big projects requiring after-hours labor (like the three times we moved the entire pet store within the mall!) he would reward us, and keep us from going home, by ordering three or four large Domino’s “ExtravagaZZa” pizzas. I remember coming to the pet store for work the morning after a late night, and he and I gnawed on some of the cold pizza still laying on the counter in the back room.

We weren’t very close friends; I mean, he was my boss. I only went to his home a few times, so I can’t speak to the rest of his culinary repertoire. Sure, I’d seen him move a rock the size of a refrigerator, and I knew he was a hockey player and part-time/reserve city police officer—when he wasn’t at the pet store. He was not exactly domestic.

Neither was I, at the time. But I was starting to pay attention to methods and procedures for making tasty foods, so in this case it was like a big brother showing me how easy it was to make “good tasty cheap stuff, and it makes a ton.” He kind of laughed as made it. He hadn’t been in college for a number of years, but had just gotten a divorce, was living in an apartment, and was paying alimony and child support.

So here are my original notes for “Mark’s Good Old Stuff”:

Get some links of Italian sausage, cut it up and fry it in a skillet. In a separate, large saucepan, heat up a can of chili beans. Dump the sausage and grease and all into the beans. Put in some cooked macaroni (elbow or whatever). Did he put in some oregano? A bay leaf? Some green pepper, black olives, onion? Some canned tomato?

And here’s my version, as I eventually developed it into more of a formula. (Or maybe it’s more of a checklist for when you stop by the grocery store on your way home from work.)

8 oz. rotini pasta (or elbows, or shells, or whatever)
Italian sausage (2 to 4 big links; remove casing)
green bell pepper (chopped) (optional)
onion (chopped) (optional)
1 can corn (whole kernels) (drained)
1 can chili with beans
1 can chopped tomatoes (optional)
1 can black olives (California olives) (drained and chopped)

Cook the pasta until al dente; don’t overcook it. While it’s cooking, prepare the rest of the stuff. Use a big, heavy skillet. Fry the sausage; chop it up while it’s cooking. Remove some of the grease (or not). Add the green bell pepper and onion, if using, and fry those, too. Add the corn to the sausage in the skillet, and keep heating. Then add the chili and tomatoes (if using), and heat through. Add the black olives last, because they’re kind of delicate. Then combine the drained pasta with the “stuff.” Heat through.

Optional: serve garnished with sour cream or shredded cheese, such as cheddar, mozzarella, or parmesan. If you really want to dress it up, top it with chopped cilantro or green onions.

Note: clearly, you can adjust it however you wish. I like it with hot Italian sausage and spicy chili.

Finally, this actually tastes better the next day or so after you make it. So this makes a ton, and you do want to have leftovers.

Friday, September 16, 2022

Grilled Cheese Atrocity

Yaay! It’s time for another childhood culinary atrocity! This time, I’m sharing with you the special grilled cheese sandwich I “invented” in high school!

Well, what kinds of foods did you proudly “invent” when you were first making your own food?

I’ve been revisiting some of my formerly favorite foods that I used to make for myself when I was a youth. Before I had heard of health foods. Before I had ever eaten at a Chinese restaurant. Back when pizza and spaghetti were “ethnic” foods.

The Requisite Digression

Yeahhhhh . . . back when Taco Bell was a spicy new fast-food place for us midwesterners. Its menu board had pronunciation helps like “EN-CHI-REE-TOH” and “TAH-COH.” Remember when Taco Bell’s taco sauce came in small plastic tubs with a peel-off, foil lid? Remember when they added a second flavor of taco sauce, “Hot”? Then, they started to put the sauce into the kind of packets they’re using today, only without the silly catch-phrases? Back when the corporate colors were brown, red, orange, and yellow? Well, this "recipe" dates back to about that time. Yes, you young things, back when I was young, there were only two sauces at Taco Bell: Mild and Hot! And we liked it! This was way before “Fire,” “Wild,” “Diablo,” “Fire-Roasted,” and “Green.”

And while we’re reminiscing, I’d like to say a few words about “authenticity” and Taco Bell. I understand the urge to pillory Taco Bell for being an inauthentic non-Mexican ripoff of true Mexican cuisine. It’s not Mexican. I don’t think it claims to be authentic. It is essentially fast-food junk food with garbage cheese, but . . . for many of us in the Midwest, it was the first time we ever had food that was spicy, that burned our mouths. It taught us the words taco and burrito. It wasn’t great food or even really good, but it helped us discover the cuisine. It was like Kenny G to jazz, or Boone’s Farm to wine; it was our gateway drug.

I’d also like to point out that, unless you like to cook for yourself, if you live in a small town in the Midwest, Taco Bell may indeed offer the best "Mexican" food for miles. This was especially the case in the 1980s and before. Even today, many of the so-called Mexican restaurants are worse than Taco Bell. The Bell’s basic tacos still stand up pretty well against some of the stuff I’ve had in midwestern Mexican joints. Honestly, I think midwestern Mexican restaurateurs know that a majority of their customers prefer seas of cheesy beans and gloppy, fatty meats, with sweet, ketchup-like salsa. And Taco Bell can be better than that.

Also, among fast-food places, Taco Bell is about the only one that offers anything besides salads and French fries for vegetarians to eat. And "Mexican-inspired" fast food can be much tastier than the standard ol' burger and fries.

Which leads me back to my topic. My sandwich has very, very little to do with Mexican food. Nothing, in fact. But Taco Bell Hot sauce is a key ingredient.

So hang on to your stomach, here we go!

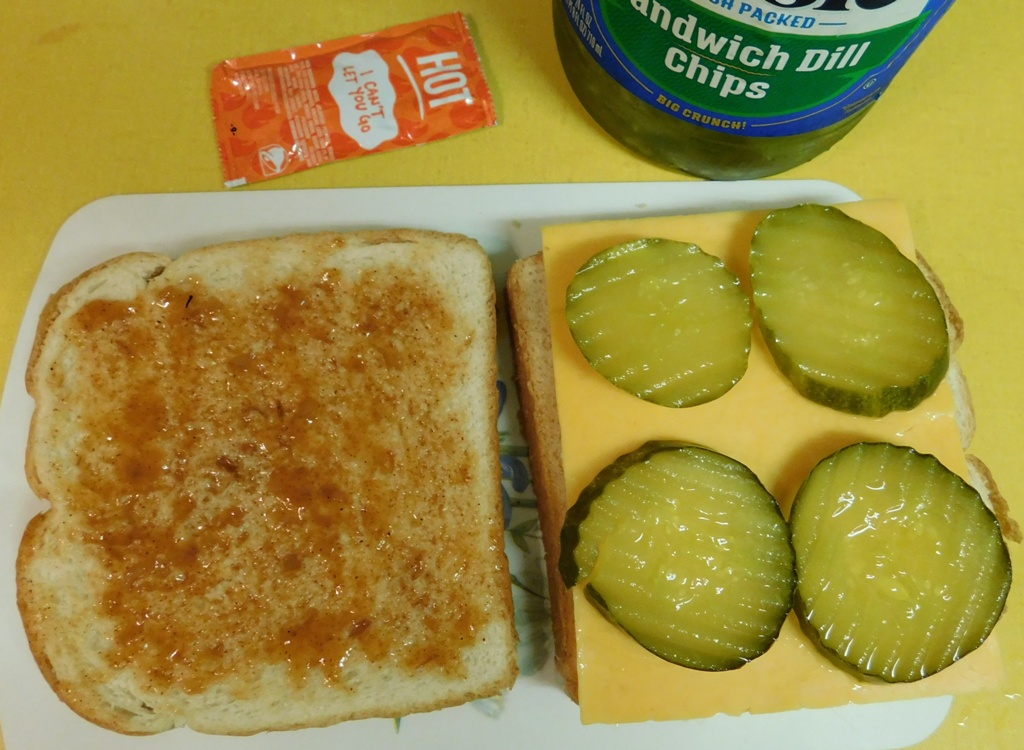
Taco-Bell-Hot-Sauce Grilled Cheese Atrocity

For one sandwich, you will need:

  • 2 slices of sandwich bread (the plain white stuff)
  • 2 packets of Taco Bell Hot taco sauce (not any other flavor)
  • About 4–5 hamburger dill pickle slices (Heinz preferred)
  • 2 slices of mild or medium cheddar cheese
  • Margarine or butter (for frying)

Spread the Taco Bell Hot taco sauce onto one of the slices of bread. Top with sliced cheese, then add the pickle slices. Cover with the other slice of bread.

Heat a skillet, add a pat of margarine or butter into the skillet; when it’s melted, heat the sandwich on the buttery skillet. Flip. Cook until toasted. You can eat it now, or . . .

Bonus points: In high school, I used to make this in the evening, then pack it up in aluminum foil and carry it to school for lunch the next day. So try this: let the sandwich cool on the counter, then wrap it in foil or a sandwich bag. Refrigerate overnight. Eat cold, or at room temperature, as if it had to sit in your locker until lunchtime. It’s actually better this way, after it’s rested and solidified somewhat. I’m not sure why, but it’s the same principle as enjoying a cold slice of pizza or a piece of cold fried chicken. It might be because, being more solid, the sandwich seems more substantial. It’s also tidier to eat, now that it’s not gooey and drippy.

What is it that makes this work? On paper, it’s an atrocity: dill pickles and taco sauce. It must have something to do with the specific flavor of the Taco Bell Hot sauce. My guess is that the smooth, mild cheese melds whatever flavors the pickles and taco sauce have that can harmonize. The distinctive flavors of Taco Bell Hot sauce include plenty of cumin with onion and garlic powders, and I think those go especially well with something in the pickles. Maybe it’s the garlic, or maybe the vinegar . . . or maybe it’s just a salt festival. But try some other hot sauces, and you’ll see it just doesn’t work right.

Wednesday, August 10, 2022

My Lemonade Atroci-tea

I admit it: I should not be proud of this . . . but guess what? I kind of am. But this does fit into the category of “childhood culinary atrocity.” Reading it, you’re gonna go “. . . ewwww.”

But not so fast! I recently resurrected this beverage a few weeks ago, when I saw they actually still make Lipton Instant Tea. So I bought a jar! I mixed up my old formula to the best of my memory, and I found it genuinely tasty. In fact, it’s better than I remembered it, which is saying a lot.

This recipe (if you can call it that) dates back to high school, when I used to sometimes bring a lunch, including a big cup for my tea. Here’s how I would make it.

In the morning, or the night before, I prepared a lemon-tea-sugar concentrate ahead of time. I used a small (2 oz.) Tupperware “midget” condiment container for my mix, which was about 1 heaping teaspoon of Lipton Instant Tea (unsweetened), about 1 heaping teaspoon of sugar, and about 1.5 ounces of ReaLemon lemon juice. I’d shake the juice with the tea and sugar, and it would form a sludgy, muddy slurry.

The horror.

It was ugly, but it blended easily with water I’d get from a drinking fountain at school. I guess I’d bring a plastic spoon with me, one that would fit into the cup along with the little Tupperware full of my sludgy stuff. (I don’t remember getting ice at school . . . though maybe I’d get a cup of ice from Taco Bell, across the street, which is where we band kids went for lunch nearly every day.) Or maybe I did without the ice.

(BY THE WAY, I'm using some pictures of old plastic souvenir/giveaway promotional cups from 1980s Columbia in this post. . . . Like, remember when Shakespeare's cups were opaque tan?)

And yeah, it’s gotta be Lipton instant tea, not Nestea. The two taste completely different. Instant tea is, almost by definition, terrible, but of the two brands, Lipton is the only one that’s tolerable. Nestea is the devil. It just is.

No, we didn’t have Nalgene bottles or Yeti sealable cups back then. So I just used one of the ubiquitous big plastic, indestructible cups that restaurants gave out back then. Faddenhappi’s, Harpo’s, Shakespeare’s, etc. You know the type.

I usually used a Harpo's cup, for the Mizzou logo and for the fact that it was from a bar. And what's cooler than the local college bars when you're in high school?

(And gosh, remember Faddenhappi's? I loved that place. They were at 700 E. Broadway and served pizzas and loaded baked potatoes; the same toppings could work for both. They probably also served salads.)

Here’s the fun part about my humble beverage: it’s basically an instant “Arnold Palmer.” An Arnold Palmer is half lemonade and half iced tea. My version simply has less sugar and more lemon, making it extra sour. Even in high school, I liked sour drinks.

No, I would not make this for company. Never. But just for little old me?

Well, let’s say, what if it’s a busy workday, and you don’t really want to spend any time brewing up a pitcher of tea. Or maybe your air-conditioning has gone out, and you want iced tea without turning on the stove, or heating anything. Instant tea is so fast.

In graduate school, I shifted away from instant tea, forever. I made sun tea all the time when I lived in Arizona. I’d get tea in bulk from the local health-food coop. In Montana, I’d set out my jar of sun tea on the back steps. Like any good lesbian, I have kept a cabinet full of boxes of various teas, black and herbal. Until a few weeks ago, I don’t think I have ever purchased instant tea. Once I moved out of my parents’ house, I never bought instant tea.

So, now that I have a jar of powdery brown Lipton Instant Tea, I’ve had fun returning to my old concoction. I’ve been experimenting with adjusting the ratios of the various ingredients. I’ve been discovering that if you put a lot of ice in it, the ice melts and mellows whatever flavor was maybe too dominant. Taking the initial few sips certainly wakes you up. But I can sip on it all afternoon.

So that’s all. Just a little salute to my former self, before I became all “foody” and snooty.

And when you consider I've happily enjoyed dirty martinis (about which a friend of mine once said, "Don't you love them? They taste just like poison!"), this rather sour lemonade-and-iced-tea blend ain't too bad.

Now I’m trying to decide if I should “confess” to more childhood culinary atrocities. What do you think? Did you “cook” things as a juvenile that today, you’d shudder to think of?

Tuesday, July 5, 2022

Julie’s Own Mediterranean Chicken and Rice

Also known as, Hey, this is pretty darn good! And it makes a ton. And if you have leftovers, you’ll be glad to eat ’em, you really will.

First, a disclaimer or two: this is adapted, with a lot of changes, from some website. Also, I make no claims of this being remotely authentic. I intend no cultural appropriation—only appreciation. “Mediterranean” seems the best way to describe the spice combination, based on my limited experience.

A slight back story, because food is always connected to something—a memory, someone we love, or a special place and time. Or maybe all of the above.

I was inspired to figure out this recipe based on my memory, from high school days (we’re talking forty years ago!), of a dish I had once at a friend’s house. My friend and her family are Greek; her mom loved to entertain (and still does); and I was invited to several meals at Mrs. Athanassiou’s house. The food was always delicious, and the hospitality warm—they always made me feel at home.

Anyway, Mrs. A made a casserole of chicken with either rice or noodles (I can’t remember which!), with cinnamon. The cinnamon, to me at the time, seemed extremely unusual in a chicken dish. I wasn’t used to seeing that spice used for anything other than sweets: cookies, cakes, coffee cakes, sweet rolls, French toast, hot chocolate.

Of course, today, with my growing experiences in making Indian food, I see that cinnamon is just as appropriate in savory dishes. It’s one reason why Indian food is so beguiling. Cardamom, which is also typecast in American/Western cooking as a “sweet” spice, fits into the same category. Same goes for mint. And this recipe uses all three.

Oddly enough, a few years ago I asked Mrs. Athanassiou about that dish that I vaguely remembered. She said she didn’t recall it. (What-what-what?!) Well, maybe I didn’t describe it well enough. And she had a lot going on back then, so maybe it was one of those “wingin’ it” dishes she made on a whim and then never thought about again.

So, the Internet to the rescue. Last time I made this, I was blown away by how good it is. A very easy one-dish meal. I do hope you’ll try it and let me know what you think!

Oh, and by the way, this doesn't much resemble what I remember Mrs. A. making. Although I really don't have great memories of that dish, I recall it being more buttery and having much less complicated spices. (Indeed, I might be getting her dish confused with a different, noodle casserole I had when I was in college.) But as I searched for recipes, I went down a merry path and ended up with this.

Notes

  • Don’t freak out about the number of ingredients; this is truly not a complex recipe. Note that you can be prepping most of the ingredients while the chicken rests with its spice mix.
  • Spices are given in ranges; alter by taste and freshness/strength.
  • Although there are lots of interesting spices in this dish, it is not “hot.” No chiles.
  • Vegetable ingredients (carrots, green peas) are given in ranges; this is not rocket science; vary as you wish.
  • I use Basmati rice from the international store; it is extremely forgiving and rarely turns to mush. There’s a reason those Indian ladies buy their rice at the international store in the big city.
  • Use a wide, heavy cooking pan/casserole pan/skillet with a lid.
  • This will make 2½ to 3 quarts (10–12 cups) of food!

Julie’s Own Mediterranean Chicken and Rice

  • 1½ to 2 tsp. allspice, ground
  • ¾ to 1 tsp. black pepper, coarse ground
  • ½ to ¾ tsp. green cardamom, ground
  • ½ to ¾ tsp. turmeric, ground
  • 4–6 boneless chicken thighs, fat and skin removed, cut into large sections
  • salt
  • olive oil
  • 1–2 cinnamon sticks
  • 2 bay leaves
  • 2–3 carrots, cut in bite-sized pieces (about half cup)
  • 1 large onion, white or yellow, chopped (at least half cup)
  • 1 16-oz can garbanzo beans, rinsed and drained
  • 2 cups Basmati rice (washed, rinsed, drained)
  • 4 cups chicken broth
  • ½–1 cup additional chicken broth (optional, for deglazing; it adds extra chicken flavor; but you can use water instead)
  • 1–1½ cups frozen green peas, thawed
  • 2 tbsp. fresh parsley, chopped (or more)
  • 1 tbsp. fresh mint, chopped

1. Mix together the first four ground spices (allspice, black pepper, cardamom, turmeric). Dry the chicken pieces, season them well with salt, then coat the chicken with the spice mix. Let it sit and come to room temperature (about 20 minutes). Meanwhile, you can prep the rest of the ingredients.

2. Chop and prep the other ingredients.

3. Coat the bottom of your pan with olive oil. Heat on medium-high until the oil shimmers. Brown the chicken pieces (you do not need to cook it through); remove from pan and set aside.

4. Add carrots, bay leaves, and cinnamon sticks to pan and sauté. Sprinkle in the extra stock (or water) as needed to deglaze the goodies (chicken bits and spices) from the pan and to keep it from burning. A few minutes after you added the carrots, add the onion. Keep cooking, adding a bit of stock and letting it sizzle/cook away until the onions are translucent and carrots are half cooked. Stir in the chickpeas. At this point there should be very little liquid in the pan.

5. Stir in the rice (get it coated with the delicious oils and stuff), add the 4 cups broth, and stir. Nestle the chicken pieces on top, bring to a boil, cover, and turn to low. Cook for 15 minutes without lifting the lid. Turn off the burner and let it sit 10 minutes, still covered.

6. Lift the lid, add the green peas, parsley, and mint; stir gently to combine. You shouldn't need to cook it anymore at this point.

Serve hot with Greek/Mediterranean side dishes: a Greek salad (tomatoes, bell peppers, cucumber, olive oil, wine vinegar, thyme, salt) or fattoush, tzatziki sauce or plain yogurt, Greek olives, feta, pita bread, etc. . . . and Mrs. Athanassiou would serve you strong Greek coffee with dessert.

Wednesday, February 2, 2022

Pickled Red Onions

They’re tasty! They’re versatile! They’re not rocket science! Seriously, this is my favorite use of red onions ever. Did I mention they’re beautiful, too? Beautiful . . . onions?

Cooking for two, I’m often left with “half an onion,” and this is a good use for leftover red onion. (Of course, you can use white or yellow onion, but those won’t be as pretty.)

It’s not so much a recipe as an idea that leads to more ideas. Here we go.

Pickled Red Onions: Is This a Recipe?

This will make 1 cup.

Start with a standard 8 oz. (1 cup) Mason jar or equivalent. To prevent your refrigerator from smelling like onions, you want to use a jar that has a good, tight lid. (Since the lid will forever smell like onions, I have one that I use over and over for this purpose.)

You’ll be using half a medium red onion, so cut it in half (pole to pole). Wrap up and put away the half you’re not using. (Maybe you can put it in some fresh pineapple salsa, or cooked kale, or something.)

Then, using your sharpest knife, slice the onion into the thinnest slices you can manage. I like to do the cuts lengthwise (again, pole to pole), but if you want to cut the other way and make thin little half-circles, that’s up to you.

As you’re cutting up the onion, poke the slices into the jar. Pack it pretty tight. Hopefully, it will all fit. (Erf!) Obviously, use your common sense here. Don’t smash it or bust it up too much. After about a day, the onions will have softened up and the liquid increased, so you might be able to stuff the rest into the jar after a few hours. (Or, find another use for the leftovers. Put them in an omelet?)

Red wine vinegar: Pompeian is a decent brand. Gluck that into the onion-filled jar until you see it coming about halfway up the side.

Sugar: add about 1 teaspoon.

Salt: add a good pinch.

Optional: thyme or tarragon are both good choices. But as little dark specks, they kind of detract from the jewel-like brilliance of the pickles.

Hot water: run the faucet so the water gets good and hot. Then use that to fill up the rest of the jar, to cover the onions.

Now, put the lid on the jar (tightly), and shake it like crazy to get the sugar and salt dissolved, and to get the onions kind of separated and well-bathed in the brine.

Store in the refrigerator overnight. Next day, admire the beautiful red color and notice how the texture has softened and yet crisped (the magic of pickling). If you don’t like the flavor, you can amend it to your taste. (Is it too tart? —then add a little more sugar. Etc.)

This will last several weeks in the refrigerator, but you'll eat it up before that.

What’s It Good For?

More like, what isn’t it good for! In a single relish, you get oniony flavor, vinegar tartness, sweet, and salty. Here are some suggestions.

  • As a relish or garnish for anything “Mediterranean.” If you’d have Kalamata olives, hummus, or feta cheese with a meal, serve these as well. It’s outstanding as a garnish. It is very nice on canapés, too.
  • Similarly, it goes well with Mexican foods. It’s great on tacos.
  • On a salad. The pickling takes the edge off of the onions, so you don’t have that disagreeable onion afterburn.
  • On a sandwich. On a hamburger. On a pizza. On a hot dog.
  • As a relish with grilled chicken or seafood.
  • Do you make avocado toast? If you haven’t tried it, you should. It’s an easy, tasty, and healthy light breakfast. There are lots of ways to make it, but one of my favorites is very simple: mix some minced pickled red onions, plus a little of their juice, with the chopped fresh avocado. Maybe add more salt. Garnish with more pickled onions on top. If you have kalonji (nigella) seeds, sprinkle a few of them on, too. Or you could use coarsely ground black or red pepper or chopped fresh cilantro. When serving this for two, I usually present the avocado mix (basically, a guacamole) in the cereal bowl I prepared it in. Then, I divide the whole-grain toasts onto each of our plates, and we spoon the avocado mix onto our toasts as we eat.
  • I haven’t used it in a potato salad, but I’ll bet that would be good, too.

Saturday, May 22, 2021

Scrambled Eggs with Dates and Turmeric

Hi! It’s time for another recipe! This is a new recipe for me, and we’re pretty pleased with it. I think you’ll like it, too. Scrambled eggs with dates and turmeric is pretty much what it sounds like, but below I give you some tips.

If you’re wanting to put more turmeric in your diet for its purported health benefits, this is a great way to do so. At the same time, the turmeric makes the eggs look temptingly deep yellow, which is a boon if you’ve got store-boughten eggs that are otherwise rather pale.

First, however, credit where credit is due: I got the idea from one of my newer favorite cookbooks, Breakfast: The Cookbook, by Emily Elyse Miller (London and New York, Phaidon Press, 2019), where it’s called “Date Omelet” and is on page 47: “Dates are an essential ingredient in Persian cooking. The dates provide an unexpected sweetness to a simple omelet and the addition of turmeric adds a bright color and an earthy note.” (Phaidon has a really fun selection of these gigantic “[fill in the blank]: The Cookbook” cookbooks.)

. . . Yes, yes, yes. I don’t know much about Iranian breakfasts (though a friend of mine from Iran once told me that at his house, “It’s not breakfast without feta!”)—but I do know that one’s breakfast eggs can definitely go in a sweet direction with success. Among the many omelet variations commonly suggested in midcentury American cookbooks is a “jelly omelet,” which I’ve tried and found actually pretty good (though the folded-over version is a little sloppy, since the jelly or jam melts and turns into drippy syrup). And also keep in mind other sweet eggy dishes, such as French toast, and any kind of sweet custard preparation.

So, dates in scrambled eggs. In addition to turmeric, I like to add some coarsely ground black pepper, in order to further ground the dish and temper the sweetness of the dates. My version is not terribly sweet. Anyway, it’s not rocket science; you can alter it however you like. Here’s how I’ve been making it. Extra tips at the end.

Scrambled Eggs with Dates and Turmeric

  • 1/2 tsp. ground turmeric
  • 1 tbsp. water
  • 3 eggs
  • 1/4 tsp. coarsely ground black pepper
  • pinch of salt
  • 1 tbsp. butter
  • 1/3 cup dates, chopped (approximate)

In a little bowl, stir together the turmeric powder with the water to make a smooth mixture (no lumps). Crack the eggs into a small mixing bowl, add the turmeric mixture, black pepper, and salt, and beat with a fork to combine ingredients.

Heat the butter in a nonstick skillet to coat skillet. When it starts to bubble, add the dates and sauté for a few minutes; just get them heated up and coated with the butter. Pour the egg mixture carefully into the pan; let the eggs start to set, then lift the edges with a wooden or heat-proof rubber spatula and let the uncooked eggs run underneath; push the cooked eggs gently toward the center. Fold or turn over as necessary to get them cooked.

Serving suggestion: Serve with pita, naan, or other flatbread; a chunk of feta cheese; a few oil-cured black olives.

Tips and comments:

For breakfast, Sue and I usually split a three-egg omelet, especially since we’re having other stuff with it. You can adjust quantities however you want.

Mixing the turmeric with the water, first, to form a slurry ensures that the turmeric will blend evenly with the eggs; otherwise, the turmeric can form lumps that are hard to break up with a fork or even a whisk. You don’t need that kind of hassle—it’s too early in the morning to be muttering “dang it!”

The reason for the gentle pouring and folding of the eggs is to give it a prettier presentation, with the dates clearly separate from the eggs. You can stir it all around if you want, but depending on how finely chopped your dates are, or how much they break up during cooking, it might look kind of, well, vomitous.

The nonstick skillet is a good idea, since you’re heating dates. Dates vary in texture (dryness) a lot. When heated, they can get really syrupy, and their sweet goo can really stick to a skillet, if it’s not nonstick.

Choice of dates: it’s up to you. I find this is a good use for leftover pre-chopped cooking dates (the kind that look like little nuggets that are coated with oat flour or whatever). This would also be really good with high-quality, soft dates that are only halved. Pit them, of course.

I like how the saltiness of the feta and olives plays off the sweetness of the eggs.

Extra points for making your own fresh flatbreads.

Saturday, July 30, 2016

Samurai Sandwich: Retro Veggie Recipe

Here’s another recipe inspired by Bloomingfoods Coop in Bloomington, Indiana, from god-knows-how-long-ago . . .

Okay, actually, I do know how long ago, because as an inveterate journaler, I took notes at the time. I know the exact day I ate the original sandwich that inspired this. I cribbed this recipe, sort of, from a visit to Bloomingfoods Coop (now Bloomingfoods Market and Deli) in June 1988, when I was taking a break from the National Women’s Music Festival, which was then held on the IU campus.

Like my beloved concoction called “Bric-a-Broc,” this is another stuffed-pita sandwich I had purchased from the deli case at Bloomingfoods. I devised my “recipe” from the ingredients listed on the label stuck to the sandwich wrapper. . . . I mean, ingredients list? I just figured it out. By now, it might be very far from the original; but hey, I like it.


Here are the ingredients, more or less, as I copied them: Pita bread, chickpeas, tahini, miso, sautéed onions, bell peppers, lemon, sea salt, garlic . . . and, of course, sprouts.

From this, my current recipe has evolved, basically a good ol’ fashioned veggie hippie hummus with Japanese influences. I’m enthusiastic about this blend, and I hope you’ll try it!


Samurai Sandwich
Based on a 1980s deli offering from Bloomingfoods Coop, Bloomington, Indiana

  • 1 15-oz. can garbanzos/chickpeas, rinsed and drained
  • approx. 2 big T’s of tahini (it’s basically a ground sesame butter; get it at the health-food store)
  • approx. 2 big T’s of miso (another health-food-store item; I suggest light miso, in the summer, and darker in winter; trust me, it’s a macrobiotic thing) (also, get the kind in the refrigerator case, because you want the good stuff)
  • juice of one lemon
  • sea salt (to taste)—or soy sauce or tamari, I say, to go with the theme
  • 1 clove garlic, crushed or pressed
  • 1 onion, chopped, sautéed until starting to brown/caramelize (add a little mirin or rice wine, if you have it, or a little splash of sherry or a pinch of sugar)
  • 2 T sesame seeds (optional)
  • half a large green bell pepper, chopped
  • pocket pitas, halved, bonus points for whole wheat, because this is a crunchy vegetarian recipe
  • crunchy greenery, such as alfalfa sprouts, or bean sprouts, or shredded raw cabbage, chopped lettuce, whatever

1. Put the garbanzos, tahini, miso, lemon juice, salt or soy sauce, garlic, and half the sautéed onion into a food processor and whirl it around until it’s super creamy. Add a tiny bit more water or more lemon juice, if necessary. Turn out into a mixing bowl.

2. Stir in the rest of the sautéed onion, the sesame seeds, and the bell pepper.

3. Pita pockets are more flexible and fillable if you nuke them or heat them in a skillet for a bit. (To honor our hippie heritage, microwaving or “nuking” them is not recommended; it’s just out of character.)

4. Spoon the mixture into pita pockets and add the crunchy greenery (sprouts, cabbage, whatever). (You could also use this as a stuffing in a wrap, made with a flour tortilla like a burrito.)


Truly, this is a recipe to mess around with to suit your own tastes. I like the sweetness of the caramelized onions and mirin. As with any hummus, you’ll need something to add crunch. Chopped cabbage or sprouts are a nice complements.


Friday, November 6, 2015

Sage-Walnut Pesto

It’s autumn. Before the freeze, those of us with herb gardens are wondering what we’re gonna do with our lovely herbs, because we sure don’t want to lose them, and they’re so perishable!


Sage is a special question for me. I grow it every year, partly because it overwinters and comes back for free in the spring, but mostly because it’s de rigueur to have sage in one’s herb garden. But I don’t cook with sage very much. It’s strong, and it doesn’t figure into many of the cuisines I tend to cook. (Honestly, I’d do much better to have a private supply of cilantro and fenugreek!)

The main things I can think of to do with sage are: 1) poultry; 2) brown sugar–winter squash concoctions; and 3) frying the leaves and using them as a garnish.

“Why don’t you dry them?” —I usually back away from drying herbs, because no matter what, they always taste like straw. Yes, I have a dehydrator, and I agree that drying one’s own is much better than buying it pre-desiccated. But it still loses so much in the process. (Parsley is an exception: Dried, it can still be used as a visual garnish, and since it retains respectable vitamin content, it can go into grilled cheese sandwiches or scrambled eggs as an easy nutrient booster.) But most herbs? Like everything else, it’s just sad to dry them.


Fresh or old, dried sage always tastes old.

But if you can get your fresh herbs melded with oil, they tend to freeze okay. And frozen pesto is great to have on hand, because when you use it, you can make some pretty humdrum foods into something you’d have to pay $6.60 or even $8.80 for in a New York restaurant.

This is based on a recipe I found on the Internet, but I’ve tripled the quantities, plus increased the amount of sage compared to parsley, since I usually have more of the former that I want to use up. So feel free to adjust the ratio of sage to parsley, even to the point where there’s much more parsley than sage. (This isn’t exactly rocket science.)


Sage-Walnut Pesto

1/4 cup parsley
3/4 cup fresh sage leaves
3 garlic cloves
2-3 teaspoons salt (to taste)
3 cups walnuts (English/Persian walnuts this time, not black walnuts)
1 cup extra virgin olive oil
1 cup grated parmesan cheese

Put the walnuts in a food processor, first, by themselves, and pulse/grind until you obtain a rather coarse, meal-like texture. Then dump that into a mixing bowl and set aside.

Then, put the rest of the ingredients in the processor, and process until it’s well-blended (puréed).

Then pour it into the ground walnuts and stir to combine. It will seem rather dry, for pesto. It should make about 3 cups of pesto.

Pack into two or three 1-quart freezer zip bags and flatten to about 1/3 inch thick; as you do so, squeeze as much air out of the bag as you can (air causes freezer burn). Freeze the bag flat on a cookie sheet for easy storage. To use, open the bag and break off the amount you need (be careful, since you probably don’t want to tear the bag). It will thaw quickly in a bowl.

Note #1: If you are using it to stuff, say, chicken breasts, you might just leave the pesto frozen as flat little chunks, since it handles better that way. Why not?

Note #2: I suppose you could use pecans instead of walnuts . . . but then it would be “sage-pecan pesto,” eh?

Note #3: I don’t know how your food processor works, but with mine, I kinda have to pre-chop the herbs, and press the garlic, before I process it. Maybe my blades are getting dull; it’s an old machine. Anyway, be advised . . .


Using Sage-Walnut Pesto

This probably isn’t the kind of pesto you’d put on pasta or use as a spread on sandwiches or pizza. It’s rather crumbly. And its flavors don’t seem to go with stereotypical “Italian” or “Mediterranean” dishes. However, here are some things I’ve done with it, and gotten good reviews:

Filling for stuffed chicken or turkey breasts. Great for chilly evenings. Not great if you don’t like sage. (But then, if you don’t like sage, why are you reading this?) Cut a pocket into chicken breasts, or pound them to about 1/2 inch thick (sprinkle water on the chicken, put it in a large resealable bag and don’t seal it all the way, or put it between layers of plastic wrap, and then pound with a rolling pin, say, or an empty wine bottle). Put a big bunch of the sage-walnut pesto into the pocket, or wrap it in the pounded chicken, and then tie with butcher’s twine or fix it closed with toothpicks. Oil it, brown it, and cook however you want—covered with foil in the oven, or in a heavy, lidded pan on the stovetop. Serve with mashed potatoes and gravy.

Sage-walnut turkey pan meatloaf. Make a meatloaf mixture out of a pound of ground turkey, 1 beaten egg, 1/2 cup bread crumbs, 1/2 to 1 cup sage-walnut pesto, and some sautéed-and-cooled chopped shallots and mushrooms, plus salt, pepper, and a jot or two of Worcestershire sauce. Shape into big oval hamburgers about 1 inch thick and pan-fry in olive oil about 6 minutes per side, set aside and keep warm. Then, melt a few tablespoons of butter in the pan drippings, and make a roux with a few tablespoons flour. Add about 2 cups of chicken stock and whisk to make a gravy, and season it with poultry seasoning, salt, and pepper. Pour over the patties. Again, mashed potatoes are a good accompaniment.

Sage-walnut turkey meatballs. Make like the pan meatloaf above, only shape into flattened meatballs. Sauté until done. Use in pita sandwiches or tortilla wraps, with mayo, lettuce, fresh tomatoes, sliced onion. Or, go all “Thanksgiving” with it and fill the sandwich with some leftover dressing, cranberries, and cooked sweet potatoes. Or, dip into plain yogurt as an appetizer or light lunch.

Use your imagination—poultry always goes well with sage, but I’ll bet this would be great mixed with sweet potatoes or winter squash, stuffed into large pasta shells or ravioli, and served with a brown butter sauce. I think it would be a great addition to a bread- or cornbread-based stuffing recipe—use it like you would dried sage, only expect it to taste much fresher and stronger, with a slight crunch from the nuts.

I’m sure you can think of more ideas!

Wednesday, January 23, 2013

Yet Another Squash and Curry Soup

Seriously—does the world need another curried squash soup? Well, I thought this one was really good. I’m not lying, either, because I’m not much of a “soup” person. This made me happy! It turned out spicy-hot, the kind of heat that lights up the back of your mouth a few seconds after you swallow, which I adore! (A result of the type of chilis I used, no doubt; “your results may vary.”)

And it’s so creamy you’d almost think there’s cream in it, but there’s not even milk.


Vegans take note: With a few tweaks (substituting oil for the butter, and veggie stock for chicken), this becomes a perfectly vegan recipe! Anyway you go, it’s pretty low fat, and doesn’t need much salt due to all the lovely spices.

It’s based on a recipe in the Vegetarian Times Complete Cookbook, by the Editors of Vegetarian Times and Lucy Moll (New York: Macmillan, 1995). The recipe I used as my guide is called “Squash–and–White Bean Soup,” on page 172 of that volume. But you know . . . who follows a soup recipe exactly? I’m not a recipe tester!

The original uses curry powder, plus cumin and allspice. I used some curry powder, but I used even more of my homemade garam masala. What is garam masala? You could conceptualize it as the “curry powder” that actual Indian cooks use! You can get g.m. at grocery stores nowadays. It’s really fun to make your own, however, and then it’s fresh and you may end up using it more (and using salt less). All the Indian cookbooks have recipes for it.

The original (soup) recipe also has you throw in the spices and stock at once—but I use an Indian cooking technique that heightens the spice flavors by incorporating them into the oil: I sauté the aromatics in butter first, then add all the spices, stirring them into the oil to make a paste (kind of like a roux). Butter and curry spices love each other! After they make love for a few moments is when I add the stock and squash.

By the way, the butternut squash can, of course, be substituted with canned pumpkin puree, though it’s not the same. The squash is sweeter, I think.

The ingredients and method are interspersed with the instructions below.

1 butternut squash
—split in half lengthwise, bake in oven with a small amount of water until soft; let cool so you can handle it; spoon pulp out of skin and puree in a food processor until smooth. Yield is about 4 cups. Set this aside.

While the squash is baking, you can prep the other stuff.

Chop up aromatic veggies and set aside in a bowl:
1 medium onion, chopped
1 cup sliced celery (soup is a good way to use the leafy, pale inner parts of the celery that no one wants as crudité)
2 cloves garlic, pressed (or minced)
4 tiny hot chili peppers, with seeds, minced (I have a bag of little red cayennes in my freezer, harvested from my garden before the killing frost—but use whatever hot chilis you want—to taste)
1 or 1.5 T minced fresh ginger root (did you know you can process ginger way ahead of time and keep it frozen flat in zip bags? It’s very, very handy!)

Measure spices into a little bowl:
1 t dried thyme leaves
1/2–1 T store-bought curry powder
1–1 .5 T garam masala (I have 3 types, and for this I used mostly a kind I made that’s heavy on the cumin. If your g.m. doesn’t have a strong cumin presence, then add more cumin, about 1/2 t.; consider adding allspice, too)

Also have ready:
2 T butter
4 cups (32 oz.) chicken or vegetable stock

Finally, prep the ingredients that will go in last:
1 can white beans
2 big handfuls of chopped kale (stems discarded)
2 T fresh parsley, chopped

The soup will take about a half hour to cook; do it all in one big pot. Heat butter over medium heat, add aromatic vegetables and sauté until veggies are translucent and fairly soft. Sprinkle in a little water if it wants to stick. Add the spices and stir to make a paste. Then stir in stock and squash and bring back to a boil; reduce heat and simmer, stirring often, for 15 or 20 minutes. Add beans, kale, and parsley, and cook another 5 minutes, or until the kale is cooked and still pretty green. Add salt to taste.

Sunday, August 7, 2011

Ginger-Peach Oat Bran Muffins

Peaches are in season—hallelujah! And you know how it goes: You get a big mess of ’em, then soon discover that your strategy of “doling out” those precious, special gems isn’t working—you wake up a few mornings later to find they’re getting softer than they ought to.

And this is why people bake with fresh peaches. Otherwise, you would just suck them up raw, like you should’ve done in the first place!


And anyway, it’s time to share with you a new oat bran muffin recipe! Click here to see the ones I’ve posted so far.

Here’s why I’m addicted to oat bran muffins: They’re delicious, compact, and portable. They’re filling without being fattening (that is, they have lots of fiber), but they never make me feel, well, bloated. With all that fiber, it’s good for the, ah, digestion. And then there’s the whole oat-bran/cholesterol thing.

Also, I believe one or two oat bran muffins, plus some good, fresh fruit, makes an excellent breakfast for losing weight (kind of like “Slim Fast,” minus the spooky additives and outrageous price tag). Great for snacking, too.


Ginger-Peach Oat Bran Muffins

As I’ve mentioned before, the basic recipe’s a blank slate that can be taken in all sorts of flavorful directions, and I can make up mixes ahead of time, making a morning’s baking very easy.

Note that the basic recipe doesn’t include the egg yolks, and uses instead only two tablespoons of vegetable oil (or olive or canola—your choice). Additional liquid can be skim milk or 2 percent, or evaporated skim milk, or low-fat yogurt, or fruit juice . . . take your pick.

So, here’s the basic recipe (for convenience, I usually buy a big bag of oat bran at the bulk store, then make up several batches with the dry ingredients, then store in the fridge in zip bags):

(((Preheat oven at 425 degrees F)))

2 1/4 c. oat bran cereal
1/2 tsp. salt
2 tsp. baking powder
1/3 c. brown sugar

To the basic dry ingredients, I add these special flavors for this recipe:

--1/4 or 1/3 cup chopped candied ginger (see below)
--a small pinch of ground cloves (optional)

In a separate bowl, mix together the wet ingredients:

--3 egg whites, or equivalent in egg substitute
--2 tbs. vegetable oil
--3 very ripe peaches, pitted, peeled, and mashed, including all their juices

Add the wet ingredients to the dry, then stir to combine. If necessary, add additional liquid (yogurt, milk, water, etc.); consistency should be similar to corn muffin batter.

Spoon into prepared muffin tins (use paper muffin cups or spray with Pam). (Makes 1 dozen.)

Bake for about 13 minutes and check; they might need to go for about 15 or 17 minutes total. Don’t overcook them. They’re done when they’re a little golden on top and a toothpick comes out clean.


About Candied Ginger

Oh, yum! If you haven’t yet “discovered” candied ginger, you’re in for a real treat! For baking, it’s a wonderful “secret weapon.” Baking tends to mellow its intensity and bring out its pure sweetness. I like to add chopped candied ginger to a pumpkin pie. Ooh, I bet it’d be good with cooked sweet potatoes or butternut squash, if you’re taking it in the “brown sugar/cinnamon” direction.

Also, I think it’s delicious as a zippy little snack—sweet and hot, very intense!—or as an addition to a really good cheese platter, just like you might include a few dried apricots or nice big golden raisins. A little goes a long way.

(Okay, now my mouth is watering!)

Where do you get candied ginger? Well, you can often buy little bitty jars of it in the “spices” section of a regular supermarket—for an arm and a leg! Seriously, that’s too dear for general cooking. Like cardamom, candied ginger is something worth going to an international grocery or bulk store for.

You can buy bulk candied ginger at Global Foods in St. Louis, for instance, or at the Dutch Bakery in Tipton. The price might vary widely, from three to five dollars a pound, but this is more or less like the price of dried apricots, so it’s not outrageous (and still better than buying it off a supermarket spice rack). Like raisins, candied ginger keeps well on a shelf, and it’s great to have on hand for any number of purposes, so I encourage you to try it out!

Tuesday, March 15, 2011

Grandma Meets Elvis!

Okay, now that I’ve got your attention, I’d like to announce two birthdays: Sue’s, and the Opulent Opossum’s!

Sue’s birthday is today—happy birthday, Sue!

And the Op Op turned two early this month. Two years I’ve been associated with America’s native marsupial! By choice! And it’s been fun.

To celebrate, I’m sharing a dessert recipe with you—it’s something I made up just for Sue’s birthday, since she adores peanut butter, and peanut-butter-and-banana is therefore a favorite flavor combo. (Yeah! She has something in common with The King!)

It’s based on my cherished fruit kuchen recipe from my Grandma Schroeder—a German recipe she learned from her mom—I hope my relatives won’t mind me playing “fast and loose” with the sacred formula. Usually, this is made with seasonal fruit (apples, peaches, berries, grapes), and no peanut butter. But here, the idea is peanut-buttery shortbread-type pastry topped with sliced bananas in a gooey, brown-sugary custard, topped with meringue.

And yeah, it’s pretty good!


Sue’s Elvis Kuchen
(Peanut Butter and Banana Baked Dessert)

2 + 1/4 cups flour
2 teaspoons baking powder
pinch salt
1/2 + 1/2 cup white sugar
1/2 stick butter
3/4 cup peanut butter (chunky is good—room temperature)
4 eggs
1/2 + 1/4 cup milk
1/2 cup brown sugar
2 to 3 cups bananas, sliced
1/2 teaspoon vanilla
1/4 teaspoon cream of tartar

Preheat oven: 350 degrees F.

First, make the dough: Combine 2 cups flour, baking powder, salt, and 1/2 cup white sugar; then cut in the butter and peanut butter. Then, add 1 beaten egg and enough milk (about 1/2 cup) to make it the consistency of cookie dough. You can set this in the fridge while you do the next steps.

Separate 3 eggs (the whites will be used for meringue—let those sit to reach room temperature); beat the yolks, then add 1/4 cup milk, 1/2 cup brown sugar, and 1/4 cup flour. Slice bananas if not already done.

Spread the dough on the bottom and slightly up the sides of a 9 x 9 inch pan. (This is easiest if you push the dough around with your hands— wet your hands with cold water to keep dough from sticking.) Then, add about two layers of sliced bananas. Drizzle the custard over and around the bananas. Bake at 350 for about 20 minutes or until dough is cooked/lightly browned, and custard is set.

While this is baking, prepare the meringue: Beat the 3 room-temperature egg whites on medium with vanilla and cream of tartar for about a minute (until soft peaks form); then switch to high speed and gradually add 1/2 cup white sugar; beat for about four minutes, or until shiny and stiff peaks form.

When the pastry is done, remove from oven and top with meringue. Return to oven for about five minutes or until meringue is lightly brown. Let cool gradually; once cooled, store in refrigerator.